

How to Do Gel Nails at Home: 7 Steps to a Perfect Salon Finish
Learning how to do gel nails at home is one of the best beauty decisions you can make. A single gel manicure at a salon costs between $35 and $70. Done at home, the same result costs a fraction of that — and once you have your kit, every subsequent manicure costs almost nothing.
Knowing how to do gel nails at home also gives you full control over your nails — the color, the finish, the shape, and the timing. No more rushing to fit into a salon appointment. No more waiting for a nail technician when you have an event in two days.
Gel nails, when done correctly, last two to three weeks without chipping. The key phrase is when done correctly. Most failures with at-home gel nails come down to skipping steps, using the wrong lamp, or applying coats that are too thick. This guide covers every step of how to do gel nails at home the right way — so your nails look salon-quality every single time.
Browse our full range of UV nail lamps, gel polishes, and nail art tools at StarabeautyUSA.
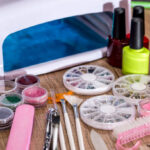
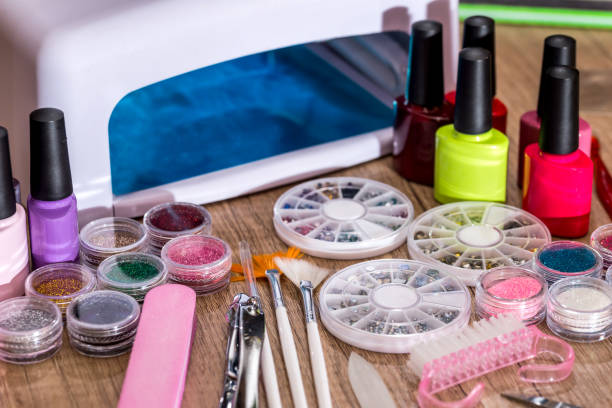
What You Need: The Complete Gel Nail Kit
Before learning how to do gel nails at home, you need the right tools. Using the wrong products — especially the wrong UV lamp — is the number one reason at-home gel nails fail or peel early.
- UV or LED nail lamp (36W minimum recommended)
- Gel base coat
- Gel color polish (one or more colors)
- Gel top coat
- Nail cleanser or isopropyl alcohol (90% or higher)
- Nail file and buffer block
- Cuticle pusher and cuticle oil
- Lint-free nail wipes
- Nail dehydrator or primer (optional but recommended for longer wear)
UV Lamp vs LED Lamp — Which Is Better?
Both UV and LED lamps cure gel polish, but they work differently. UV lamps cure all gel polishes — they are the universal option. LED lamps cure faster (30 to 60 seconds versus 2 minutes for UV) but only work with LED-compatible gel formulas. For beginners, a dual UV/LED lamp is the safest choice because it works with any gel brand.
Always check your gel polish brand’s recommended lamp wattage and curing time. Under-curing is a leading cause of gel polish peeling within days.
Why Gel Nails Are Better Than Regular Polish
If you are new to gel, understanding what makes gel polish different from regular nail polish helps explain why the process works the way it does.
- Durability: Gel polish bonds chemically to the nail through UV or LED curing. Regular polish simply dries through evaporation and chips far more easily.
- Shine: Gel maintains a high-gloss shine for the full wear period without dulling.
- Longevity: Properly applied gel nails last 2 to 3 weeks. Regular polish typically chips within days.
- Strength: Gel adds a protective layer over the natural nail, reducing breakage.
How to Do Gel Nails at Home: 7 Steps to Salon Results
Follow these 7 steps precisely. Skipping any step — especially preparation — is the most common reason gel nails fail or lift before the two-week mark.
Step 1: Prepare Your Nails
Nail preparation is the most critical step when learning how to do gel nails at home. Poor preparation causes lifting, peeling, and early chipping — no matter how good your products are.
- Remove all existing polish completely using acetone-based nail polish remover
- Trim and file nails to your desired shape — square, oval, almond, or squoval
- Gently push back cuticles using a cuticle pusher — do not cut cuticles
- Buff the nail surface lightly with a 180-grit buffer to remove shine — this creates adhesion
- Wipe each nail with a lint-free wipe soaked in nail cleanser or isopropyl alcohol to remove all dust and oils
Important: Do not touch your nails after cleaning. Natural oils from your fingers will create a barrier that prevents proper adhesion.
Step 2: Apply Nail Dehydrator or Primer (Optional but Recommended)
A nail dehydrator removes any remaining moisture and oils from the nail plate. A nail primer creates a stronger bond between the natural nail and the gel base coat. Both steps are optional, but using them — especially if your gel lifts easily — dramatically improves longevity.
Apply a thin layer of dehydrator to each nail and allow to evaporate fully (about 30 seconds). Then apply a thin layer of primer and allow to dry completely before moving to the base coat.
Step 3: Apply Gel Base Coat and Cure
The base coat is the foundation of your gel manicure. It bonds the gel system to the natural nail and protects it from staining.
- Apply a thin, even layer of gel base coat to each nail
- Cap the free edge (the tip of the nail) by running the brush along the edge — this prevents lifting at the tips
- Cure under your UV/LED lamp for the time specified by your base coat brand (typically 30 to 60 seconds for LED, 2 minutes for UV)
- Do not wipe off the sticky inhibition layer after curing — the next layer bonds to it
Thin layers are critical. Thick gel layers do not cure properly all the way through, leading to soft, tacky nails and premature peeling.
Step 4: Apply Gel Color — First Coat and Cure
Now comes the color. When learning how to do gel nails at home, this step is where most beginners go wrong by applying color coats that are too thick.
- Shake or roll the gel polish bottle gently to mix — never shake vigorously as this creates air bubbles
- Apply the first coat of gel color in a thin, even layer
- Leave a tiny margin at the cuticle — do not flood the cuticle with polish
- Cap the free edge
- Cure under your lamp for the recommended time
The first coat may look streaky or semi-transparent — this is completely normal. Gel color builds in layers.
Step 5: Apply Second Coat of Gel Color and Cure
Repeat the process with a second thin coat of gel color.
- Apply the second coat evenly, capping the free edge again
- Cure under the lamp for the full recommended time
- After curing, the color should appear fully opaque and even
If coverage is still uneven after two coats, you can apply a third thin coat and cure again. However, always keep layers thin — three thin coats are always better than two thick ones.
Step 6: Apply Gel Top Coat and Cure
The top coat seals the color, adds the high-gloss shine, and protects against chips and scratches. It is what gives gel nails their signature mirror-like finish.
- Apply a thin, even layer of gel top coat to all nails
- Cap the free edge thoroughly — this is especially important for the top coat
- Cure under your lamp for the full recommended time
After curing, the top coat may leave a slightly sticky inhibition layer. Wipe each nail with a lint-free wipe soaked in nail cleanser or isopropyl alcohol to remove this layer and reveal the full shine.
Step 7: Moisturise and Finish
The final step is often skipped — but it matters both for appearance and nail health.
- Apply cuticle oil to each cuticle and massage in gently — this nourishes the skin around the nail and improves the overall finish
- Apply a hand cream or lotion to complete your manicure
Apply cuticle oil daily throughout the wear period to keep nails flexible, hydrated, and to extend the life of your gel manicure.
7 Common Mistakes to Avoid When Doing Gel Nails at Home
Even when you know how to do gel nails at home, small mistakes cause big problems. Here are the most common errors and how to avoid them:
- Skipping nail prep: The single biggest cause of lifting and early peeling. Always clean, buff, and dehydrate before starting.
- Applying thick coats: Thick layers don’t cure fully, causing bubbling, wrinkling, and soft nails. Always thin.
- Flooding the cuticle: Gel touching the skin lifts immediately. Leave a 1mm gap at the cuticle.
- Using the wrong lamp wattage: A 9W lamp will not fully cure gel designed for a 36W lamp. Always match your lamp to your gel brand’s requirements.
- Not capping the free edge: Tips lift and chip first when the free edge is not sealed. Always run the brush along the tip.
- Peeling off gel instead of removing properly: This tears the top layers of the natural nail and causes serious damage over time.
- Touching nails between steps: Natural oils contaminate each layer. Work quickly and avoid touching the nail surface.
How to Remove Gel Nails at Home Safely
Knowing how to do gel nails at home also means knowing how to remove them correctly. Peeling or forcing gel off the nail causes damage that weakens nails over time. According to the American Academy of Dermatology, improper gel removal is a leading cause of nail thinning and brittleness.
Safe Gel Removal Method:
- File the top coat surface gently with a 180-grit file to break the seal
- Soak a cotton ball or lint-free pad in pure acetone
- Place the soaked cotton directly on the nail and wrap with aluminium foil
- Wait 10 to 15 minutes — the gel will soften and loosen
- Gently push off the softened gel with a cuticle pusher — never force or scrape
- Buff away any remaining residue lightly, then hydrate nails and cuticles with cuticle oil
How Long Do Gel Nails Last at Home?
Done correctly, at-home gel nails last 2 to 3 weeks. Several factors affect longevity:
- Nail preparation quality: The more thorough your prep, the longer your gel lasts
- Lamp quality and wattage: Underpowered lamps lead to under-cured, short-lived manicures
- Daily activities: Frequent contact with water, cleaning products, or harsh chemicals shortens gel life
- Cuticle oil use: Daily cuticle oil application keeps the gel flexible and extends wear
For a deeper understanding of nail health and why proper gel application technique matters, Healthline’s guide to gel nail care provides further detail on nail structure and long-term maintenance.
Gel Nail Art Ideas for Beginners
Once you are comfortable with the basic technique of how to do gel nails at home, nail art is the natural next step. These beginner-friendly designs require minimal tools:
- French tip: Apply a nude or pink base, then use a white gel polish with a fine brush or French tip guides for the classic white tip
- Ombre/gradient: Apply two gel colors to a sponge and dab onto the nail before curing for a gradient effect
- Glitter accent nail: Apply gel glitter polish to one accent nail for an elegant, low-effort design
- Negative space: Use nail tape to mask off sections of the nail and apply gel color to the exposed areas for a modern geometric look
Browse our full nail art tools collection at StarabeautyUSA for dotting tools, nail brushes, glitters, and stamping kits to elevate your at-home gel nail designs.
Frequently Asked Questions About How to Do Gel Nails at Home
These common questions about how to do gel nails at home come up regularly among beginners:
Can I use regular nail polish with a UV lamp?
No. Regular nail polish does not contain the photoinitiators that respond to UV or LED light. It will not cure under a lamp and must air dry as normal. Only gel-formula polish is compatible with UV and LED lamps.
Why are my gel nails peeling after a few days?
Early peeling almost always comes down to one of three causes: insufficient nail preparation (oils or moisture left on the nail surface), coats applied too thick, or under-curing due to insufficient lamp wattage. Review your prep and curing technique before your next application.
Can I do gel nails at home without a UV lamp?
Standard gel polish cannot be cured without a UV or LED lamp. However, there are no-wipe, no-lamp gel-effect polishes available that do not require curing — but these are not true gel and do not last as long. For genuine gel nails that last two to three weeks, a UV or LED lamp is essential.
How often should I take a break from gel nails?
Nail care professionals generally recommend taking a one to two week break from gel every two to three months. During this time, apply cuticle oil daily and use a strengthening nail treatment to restore nail integrity. This prevents thinning and brittleness from prolonged gel use.
Is it safe to do gel nails at home every time?
Yes, when done correctly. The key is proper removal — never peel — and regular nail hydration between applications. Proper technique when learning how to do gel nails at home is what keeps nails healthy long-term.
Conclusion: Salon-Quality Gel Nails Are Within Reach
Mastering how to do gel nails at home is a skill that pays for itself after a single application. The process is straightforward when you follow the steps correctly — prepare thoroughly, apply thin layers, cure fully, and remove properly.
The 7 steps in this guide cover everything you need for a perfect at-home gel manicure. From choosing the right UV lamp and gel base coat to applying your color coats and finishing with a high-shine top coat — each step builds on the last.
Start with a neutral or classic color for your first attempt, follow the steps patiently, and you will have a salon-quality result that lasts two to three weeks — at a fraction of the salon cost.
Shop our complete range of UV nail lamps, gel polishes, base coats, top coats, and nail art tools at StarabeautyUSA — everything you need to do gel nails at home like a professional.
Related Reading:
- The Complete Guide to Nail Art Tools 2026
- Best Nail Art Trends 2026: Colors, Shapes and Designs
- How to Choose the Best UV Nail Lamp for Home Use
Published by StarabeautyUSA | Expert Beauty Tips for Nails, Hair, Makeup & Skincare | Shop now | Worldwide Shipping Available
2 thoughts on “How to Do Gel Nails at Home: 7 Steps to a Perfect Salon Finish”
This step‑by‑step guide makes DIY gel nails feel so achievable! I love how you broke down the process into clear steps and included tips for salon‑quality results at home. The reminder about UV lamp safety is especially helpful. Definitely bookmarking this for my next self‑care day!
I’ve been nervous about trying gel nails myself, but this tutorial gave me confidence. The reminder about proper curing time is a game‑changer!